 |
The
Sundial Primer created by Carl Sabanski |
|
|
The
Sundial Primer created by Carl Sabanski |
|
| The Sundial Primer Index |
|
DeltaCad Sundial Macros - Valentin Hristov Valentin Hristov wrote a number of DeltaCad macros that can be used to generate a variety of different sundials. Many of them are paper models and a lot of fun to make. Just check them out and you will agree! Also be sure to check out Valentin's web site at: BEST OF MY STUFF for the latest variants of the sundial macros and other funny and useful stuff. I would like to thank Valentin for reviewing these pages and providing corrections as well as many useful editorial comments. There are quite a few macros available and they are discussed over a number of pages. However, all the files are available here. The macros offer many design options so spend some time trying them out and see what you come up with. Many of the sundials are available as paper models. They need to be cut and folded but are easy and a lot of fun to make. Valentin was strongly influenced by a friend to think the "origami" way. NO GLUING IS REQUIRED! Others are templates for constructing some unique sundials. Even the paper sundials can be scaled to a larger size and can be built from a variety of materials. An advantage of most of the models is there is no need to make a separate gnomon (style) because suitable edges are used as gnomons. Valentin's method of generating the hour lines for his sundials is very interesting and is described as follows. "In all constructions I prefer to calculate first the coordinates x0, y0, z0 of the vector of the direction of the sunlight in the celestial coordinate system using the declination and the hour angle. [Here (x0, y0) is the celestial equatorial plane with x0 in the E/W direction and z0 is celestial N.] Next I make three or four transformations of the coordinates: 1) rotation around the horizontal E-W
axis [x1=x0 - E/W, y1 - horizontal N/S, z1 - Zenith/Nadir] (negative z1
indicates that the sun is above the horizon). Thus I have the coordinates of the sunlight vector in the new convenient coordinate system related to the drawing. Depending on the goal I make projections in the direction of the sunlight of: 1) a point (the nodus)
intersecting with some plane or IMPORTANT: Be careful if you are used to entering longitude values as positive for west and negative for east. In these macros the sign convention is reversed. Check out the following pages for details on some very interesting sundials you can make: Polar Nodus/Gnomon Box Sundials Horizontal Box Altitude Sundial This page uses the "Polar Box Sundial" to describe how to assemble a typical paper box sundial. Box sundials presented on other pages use the same techniques and the instructions are not repeated. Read the following tips as they may be of some use in the construction of your sundial.
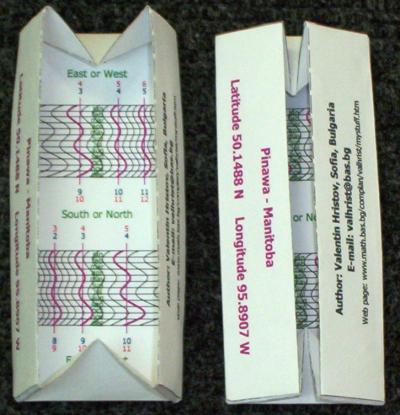
This box sundial is generated after the user enters the "Latitude", "Longitude" and "Central meridian" of the sundial's location as shown in Figure 1. A "Place" descriptor can also be included. The hour lines are automatically corrected for the Equation of Time. Longitude correction can be removed by entering the same value for "Longitude" and "Central meridian".
Figure 1 - Polar Box Sundial Macro The sundial drawn with this macro is shown in Figure 2. The hour lines are corrected for longitude and the EoT. The macro does not determine whether or not the sundial is illuminated and every hour line is shown for the entire year.
Figure 2 - Polar Box Sundial Orientating the sundial for use is easy using the north and south arrows. The sundial as drawn and constructed is used as a polar sundial oriented along the true north-south line. The hour numbers along the centre of sundial are used. There are a second set of hour numbers along the top and bottom of the sundial. These are used when the sundial is set up to function as a vertical direct east or direct west sundial. These types of sundial are also polar sundials and the hour lines appear the same. However if the box sundial is placed in a vertical position and turned to face east or west the shadow casting edges (styles) will no longer point to the celestial pole. In the Northern Hemisphere, the vertical direct east sundial must be rotated counterclockwise and the vertical direct west sundial must be rotated clockwise. The direction of rotation is reversed for the Southern Hemisphere. This rotation is in the vertical plane of the sundial and the angle of rotation is equal to the co-latitude (90º - latitude). This can be accomplished using the existing base by placing the triangular pieces flat on the vertical surface and rotating the sundial in the appropriate direction until the bottom edge is horizontal. See Figure 7. The photograph in Figure 3 shows the sundial model cut, folded and ready for assembly.
Figure 3: Cut out the model and fold carefully. Now watch very carefully or you will miss the next step...I did! Look at the photos in Figure 4. Fold the tabs on the two long sides against each other. If the folding instructions were followed correctly this comes naturally. Look at the end of one of these folds. A natural pocket will be visible as can bee seen in the first photo. Raise one of the short ends and slide the arrowed tabs into the pockets. Repeat the procedure with the other short end as shown in the second photo. The handle of a small artist's brush is useful in opening the pocket and pushing the tab in once it has been partially inserted. The box and therefore the sundial is now complete.
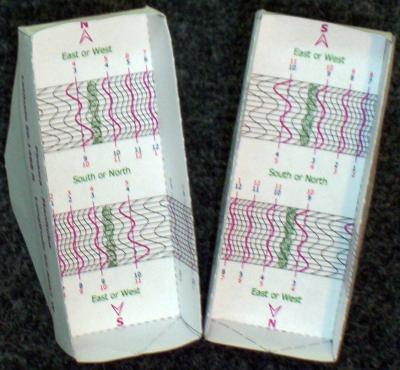
Figure 4 - Assembling the Polar Box Sundial After assembly adjust the base triangles so they are parallel with the sides. Figure 5 shows two completed sundial. The one on the left is designed for the Northern Hemisphere (N at the upper end) and on the right for the Southern Hemisphere (S at the upper end).
Figure 5 - Polar Box Sundial Model: Northern / Southern Hemispheres The photograph in Figure 6 illustrates how the sundial folds into a neat flat package.
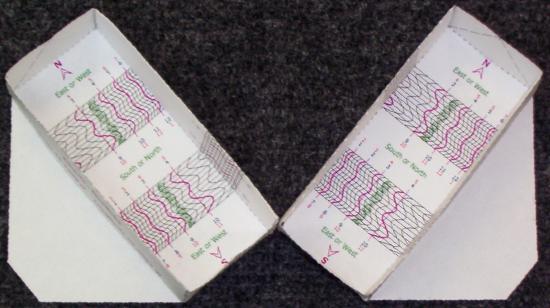
Figure 6 - Folding the Polar Box Sundial The two "V" folds located between the tabs with arrows can be omitted if the sundial will not be folded flat. This will result in a more rigid box. The sundial can be used in its main position most of the time, except early in the morning and late in the evening if the day is longer than 12 hours. Then, as it was discussed earlier, this sundial can be used as a vertical direct east or direct west sundial, which allows coverage for the entire period from sunrise to sunset. Figure 7 shows how this is done.
Figure 7 - Vertical Direct West and East Box Sundial Models (Northern Hemisphere) Note the mountain folds used to fold back the sloped base are not shown as dashed lines but as solid lines in the drawings produced by the other box macros. Don't forget to fold them.
|